Saturday, 18 December 2021
Friday, 17 December 2021
If we have an existing Virtual Network Gateway for VPN, and when we are trying to create an additional Gateway for ExpressRoute, we will get an error called “in use,” so we can not create another Virtual Network Gateway in the Azure portal. In this article, we will learn how to resolve this issue using Azure PowerShell.
Thursday, 9 December 2021
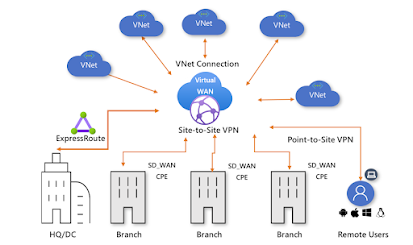
Azure Virtual WAN is a managed networking service that integrates networking, connectivity, security, monitoring, and routing features. Azure Virtual WAN is supported ExpressRoute, Point-to-Site VPN, Site-to-Site VPN, and VNet-to-VNet. In this article, we are going to learn how to configure Azure Virtual WAN.
Wednesday, 24 November 2021
Introduction
There are two types of ExpressRoute connections from Azure to the customer end. One is ExpressRoute Circuit, and the other is the Virtual Network gateway for ExpressRoute. In this article, we will learn how to configure the Azure ExpressRoute gateway. If we need to configure the Gateway, we need the Peer circuit URL and the Authorization key. The circuit owner creates an authorization key and the peer circuit URL from their ExpressRoute circuit, and the authorization is valid for only one connection. If we need to make more connections, each connection requires a separate authorization key.
Saturday, 30 October 2021
Thursday, 28 October 2021
Want to learn about Cloud Infrastructure Management? Join at Azure Fundamentals Virtual Training on 30 October at 9:00 AM IST.
Thursday, 21 October 2021
Introduction
Azure Private Links works with Site-to-Site VPN, Point-to-Site VPN, and the Express Route to provide private and secure access to Azure PaaS services over Azure Private Endpoints. The Azure PAAS Services include a read-only network interface service called Azure Private Endpoint. It allows you to add deployed sites to your virtual network and restrict network access to them.
Wednesday, 13 October 2021
I had an extraordinary session with the Sri Lanka Institute of Information Technology (SLIIT) students on October 13, 2021. It's was a fantastic session because the students are willing to learn new technology.
Core subject: Azure Infrastructure Management
Thank you, SLIIT Carrer Guidance Unit, for organizing this event.
Saturday, 25 September 2021
Friday, 24 September 2021
In this video, I explain how to claim the Microsoft free vouchers for Fundamentals exams.
Monday, 20 September 2021
In this video, I explain the benefits of Microsoft Learn and how to use Microsoft Learn.
Friday, 17 September 2021
Sunday, 12 September 2021
Introduction to Cloud Computing in Tamil, in this video, I have discussed Cloud service providers, Cloud modules, Cloud services.
Wednesday, 8 September 2021
The Azure Route Server is the easiest way to configure dynamic routing between our Network Virtual Appliances (NVA) and our virtual network. It allows us to exchange routing information directly through the Border Gateway Protocol (BGP) routing protocol between any two Network Virtual Appliances that support the BGP routing protocol. Azure Route Server eliminates the manually configured route tables. The Azure Route Server could be a fully managed service and is configured with high availability. In this article, we will learn how to configure Route Server in Azure using the Azure portal.
Thursday, 19 August 2021
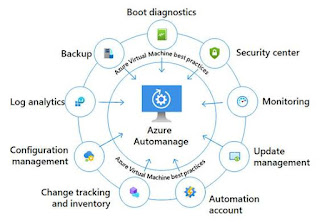
Azure Automanage is the latest feature of managing our virtual machines with optimized, automated operations across the entire VM lifecycle. Automanage is helping us reduce day-to-day management tasks in various areas. Azure Automanage services such as backup, monitoring, update management, security, OS baselines, and more. In this article, we will learn how to deploy Azure Automanage and how to manage our Virtual Machines using Automanage.
Sunday, 15 August 2021
Saturday, 31 July 2021
Tuesday, 20 July 2021
We had a special discussion with the SLIATE Batticaloa IT and Management team to migrate their workloads to the Microsoft Azure cloud. The workloads are successfully moved to the cloud!
Thursday, 15 July 2021
Introduction
The Virtual machine snapshots are the best way to clone the Virtual machine without any interruption; at the same time, we can use the snapshot to create multiple VM's. We can also consider that a VM snapshot is the copy of the disk file of our Virtual machine. The VM snapshots are very helpful to recover our virtual machine from a disaster. In this article, we are going to learn how to create a Virtual machine using the snapshot.
Step 1
We have one Virtual machine called “Source-VM,” and that VM has already installed the IIS server. We are going to take the snapshot from this running VM.

Step 2
To verify that IIS services are running, copy the Source-VMs IP address and past it to the internet browser. Now we can see that the IIS server is running in the Source-VM.

Step 3
Select Disks under the Settings, and then select OS disk (Source-VM_disk1).

Step 4
In the Overview, click the + Create snapshot to start the snapshot creation.

Step 5
In the Create snapshot page, enter the snapshot name, then select the Storage type as Standard HDD because of the cost, and then click Review+ create.

Step 6
Now the snapshot has been created, and we can verify the status.

Step 7
After successfully created the snapshot, we have to create the managed disk, so click + Create.

Step 8
In the Create a resource search box, type Managed Disk and then select it.

Step 9
Click Create to start the Managed disk deployment process.

Step 10
Enter the name for the managed disk and then select the Source type as Snapshot.

Step 11
In the Source snapshot, select the snapshot that we had created (snapshot-SourceVM).

Step 12
After successfully select the Source disk, click Review + create.

Step 13
After successfully deploying the Managed disk, select the managed disk (ManagedDisk-SourceVM); in the Overview, click + Create VM.

Step 14
In the Create a virtual machine page, enter the virtual machine's name, and then you can find that our Managed disk is automatically selected in the Image option.

Step 15
We need to select the License type; in this scenario, our source VMs Operating system is a Windows server, so select the Windows server.

Step 16
On the Networking page, we can select the existing Virtual Network or create the new Virtual network and link it to the new or existing network. After that, we can directly click Create + Review.

Step 17
We have successfully deployed the new Virtual machine using our Snapshot, and now we can test our Virtual machine, so copy the Public IP address.

Step 18
We have to add port 80 and port 443 to the Network security group.

Step 19
We have successfully deployed the copy of the source VM using the snapshot.

Summary
In this article, we have learned how to deploy the Virtual machine using the snapshot in the same region; in our next article, we will learn how to use our snapshot in a different region.


.jpg)